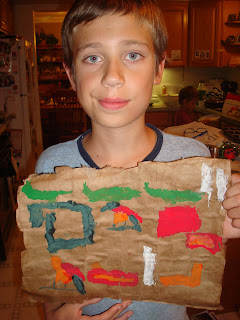
It turned out to be a 3 day project. Day 1 we made the paper (it had to dry overnight). Day 2 we drew hieroglyphs on them, copying from some of our Egyptians books I got from the library. Day 3 we painted the hieroglyphs. It was also a very messy project, however, a little mess now and then is a good thing, don't you think? Especially if the children help clean it up!
We covered our work surface with long strips of wax paper so the glue would not stick to it. Then I poured glue into a large bowl and mixed with equal parts water. I ended up using this entire bottle of glue for 5 pieces of "papyrus" paper.

Next we tore paper grocery sacks into long strips. These were to simulate the strips of papyrus that would be cut lengthwise down the reed, pounded to get their natural juicy "glue" out, and then covered and left to dry. We dipped the strips into the glue mixture and squeezed off the excess.


Then we lay the strips next to each other, slightly overlapping.


This was a difficult project for our sensory child, yet he wanted to do it too. I was proud of him for following through, and he did a super job!

When we had enough strips going one direction, we placed a second layer of strips on top, going crossways. Here is Little Man's "papyrus" when he had finished with his strips. I took my rolling pin to it after this picture was taken, to squeeze out all the excess glue!

We let the papers dry overnight and then drew on them the next day. In one of our library books were pictures of 24 hieroglyphs that stand for 24 letter sounds. Each of the children used these hieroglyphs to "spell" out a phrase.


 And finally we painted them!


Ta-da!! Five colorful and unique papyrus sheets with hieroglyphics on them!


 It was a very fun project! I have learned that the finished product is not nearly as important as the process of doing it, and the memories that are made as we work together. We're looking forward to more fun hands on activities as we learn about ancient times!
That's great! We made a papyrus project (I forget the source) but it bombed! LOL oh well...
ReplyDeleteBlessings,
Laurie
I'd love to know the book that had the 24 hieroglyphics. The one we have has 26 and I want to compare two sets. Many have only 24 and yet Gregory is insisting there are 26. I have told him they were just making them fit our alphabet. ;-)
ReplyDeleteBeth, it was the UG history core book. Page 124-125.
ReplyDeleteLooks like fun! That was one of the projects I decided to leave for later because I figured when we got around to it again we'd have four kids who could participate rather than just two. Hope your next week goes just as well.
ReplyDeleteI'm so bookmarking this for later.
ReplyDeleteWhat a great idea. :)
Found the list -- thanks. I need to compare it to the other ones we have. Gregory already has the other list almost completely memorized.
ReplyDeleteWe may have to try this!
ReplyDeleteJust curious - how do you handle all the projects and the desire of the children (if they're like mine) to keep EVERYTHING - do you take pics of everything and let the actual projects go after a unit is done/celebration? and perhaps keep 1 or 2 favorites? Just curious what others are doing :)
ReplyDeleteSoooo neat! that looks like so much fun and a lesson that they will remember for a long time!
ReplyDelete