If you consider yourself a seamstress you will want to stop reading right now. :-)
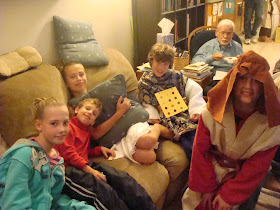
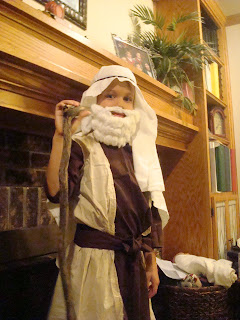
I only had one day to sew costumes for our unit celebration last weekend, and I had 4 to make (Little Man used a Biblical costume from when his sister was his age and needed it for a church program, so his was done. Yay!). So nothing I made is going to win any contests. Still, they look pretty good in the pictures, don't they? Proof positive that you don't need to spend much time or have much expertise to do simple costumes!
About 4 years ago when we were getting ready for our very first unit celebration (a medieval feast) I went to the Salvation Army thrift store and bought several solid colored top sheets for about $3-$4 each. Those sheets served us well as medieval "tunics" (no sewing at all, just slits for our heads cut in the middle of a fold) and now was the time to turn them into something else. Every single costume except Little Man's used to be a sheet! The only exception to that was the colorful swirly blue fabric I purchased to make the High Priest's ephod.
The Egyptian costumes were the easiest. Daughter G's was a large piece of white sheet folded in half, with a slit cut for her head and then sewed up the sides. Son L's was just a long strip of sheet material wrapped around his waist and pinned. Ta-da!
For the other two Biblical costumes I modified a bathrobe pattern that I already had. We needed two layers for Moses' costume (robe and sleeveless tunic on top) and for the High Priest's costume, three layers. So a total of 5 tunics, some with sleeves and some without. To save time I cut the tunics out two at a time. Below you see the white fabric for the High Priest's robe and the beige fabric that became Moses's sleeveless tunic.
If one layer needed to be shorter than the other, I just folded back the pattern, cut across the short one, and then put the pattern back to cut the longer one.
I never changed thread color. Everyone got red because that's the robe I sewed first! I finished very few edges.
And that's how I made 4 costumes in one day.
While I did the sewing, daughter G worked on the accessories. She is the queen of costume accessories and I couldn't have done this in one day without her! Here she is making the beard that Moses and Abraham shared. It is just cotton balls glued onto a form that she made from a sheet of printing paper. She curved it slightly so it would fit around a face, and measured on a real face frequently while working.
She sewed a loop on each top corner out of embroidery floss to fit over the ears.
Here is Moses wearing it!
The High Priest's costume took the longest simply because it was 3 layers, and because I took the time to hand sew small bells on the bottom of his blue tunic. This took longer than any of the machine sewing, but really added authenticity, and I did it while my husband and I watched a movie so it wasn't too boring.
Son G made his breastplate out of yellow posterboard and colored buttons. He used a page in The Rose Guide to the Tabernacle to help him know which color of button to use for each gem, and how to place them in the proper order.
He also made his shofar out of yellow posterboard and a balloon. We followed the directions in the book Old Testament Days, but I have to say, it didn't work that well for us. We ended up taking the balloon out and using the mouthpiece from my husband's trumpet instead. That worked great!
I made the High Priest's turban out of yellow posterboard and a plastic Target shopping bag! We cut a strip of posterboard long enough to go around his head, folded it in half lengthwise, and then inserted the bag into the fold and stapled it shut.
The front.
And the lovely target symbols on the back! :-)
Here they are! Two Egyptians, Moses, Abraham, and Aaron the High Priest.
2 yards of fabric for the High Priest's ephod: $11.50
package of bells: $3.99
time spent cutting and sewing: about 9 hours
memories made: PRICELESS!
For the fruit of the Spirit is love, joy, peace, patience, kindness, goodness, faithfulness, gentleness, and self-control. ~ Galatians 5:22
Friday, October 29, 2010
Tuesday, October 26, 2010
How we Made our Model of the Tabernacle
Please read my Disclaimer post before reading this one. :-)
To make our Tabernacle model we first went to the craft store and found a bunch of stuff we weren't really shopping for! (and that stayed at the store)
hahaha
But we also found things we needed. We talked about the project and planned it out before going to the store. Since we intended to send it later to my parents, our model had to be easy to take down and put up again. We looked at pictures of other models online to give us ideas, and decided to use a foam base as in my friend Laurie's model. We also assigned one of the holy articles to each child to make out of sculpey clay, so one of the children was tasked with the job of finding the sculpey clay in the store, and another couple of them picked out the paint colors we'd need (small bottles of acrylic paint for painting the holy things).
Here G and G are picking out the felt coverings for the Most Holy Place. We got four different colors to correspond to the four different coverings ~ white for "linen of the finest quality", gray for "goat's hair", red for "ram's skin dyed red", and brown with a swirly pattern for "the hide of sea cows".
This entire project took us about a week, but most of the work was done during just two of those days. The children completely owned this project. I did very little, and in fact, could have probably done nothing!
We found a 12" by 20" piece of foam for the "ground" and spray painted it brown. I'm not sure I'd spray paint foam again, as the paint seemed to melt the foam in a few places, but we figured that made the ground look more realistic. We also spray painted some craft sticks gold, to simulate the acacia tent poles that were overlaid in gold. Spray paint worked fine on those. Once the foam and sticks were dry, we began poking the sticks into the foam, evenly spaced.
I stretched some white cotton fabric around the tent posts, gluing it to the two posts that formed the entrance to the courtyard.
Most of the children spent an hour or less on their sculpey clay object, with the exception of daughter G who spent much longer on the Ark of the Covenant. Son G made the lampstand.
Little Man made the altar of incense (with some help from me). His big sister showed him how to make a clay rope around a toothpick, the toothpick giving extra stability to the handles.
I baked the sculpey clay objects as directed, at 275 degrees for 15 minutes per 1/4" of thickness, but for some reason this time they actually took much longer to bake. I just kept checking them and leaving them for a little longer. Most items baked for an hour or more. The next day when they were cooled, we painted them. Son C made and painted the laver, or washbasin. The washbasin and the altar of burnt offering were the only objects that were covered in bronze. All the other objects were covered with gold. So son C painted the outside of the washbasin bronze, and the inside blue, for the water.
In addition to the Ark of the Covenant, daughter G made tiny little ten commandment tablets for the inside of the Ark, as well as Aaron's rod and a small jar of manna. Here she is painting the jar. She was in her element for this project!!
Little Man painting the altar of incense.
Daughter G wove the curtains for the entrance to the courtyard, entrance to the Tabernacle, and the curtain separating the Holy Place from the Most Holy Place on cardboard looms she made from an empty cereal box. We found beautiful yarn that had purple, scarlet and gold flecks in it, but we couldn't figure out how to weave in cherubim, so we left that detail out of our model.
I made loops in the edges of the tent fabric out of embroidery floss, and we inserted the popsicle-stick-top-of-the-curtain into these loops. This shows the entrance to the courtyard from the back.
We had to fasten the Most Holy Place curtain a little differently.
An action figure from an Indiana Jones play set served as priest! He is blowing a sculpey clay shofar.
Here is the altar of burnt offering that I made. One trick my daughter taught me is to wad up a ball of foil and put it in the middle if you are making a large boxy shape out of clay. It enables you to use less clay, and it helps the clay to bake faster since it's not solid all the way through.
Son L made the table of the presence. He used pennies for the showbread, a stack of 6 on each end of the table, one for each of the twelves tribes.
Here is a close up of the Ark daughter G made,
with the articles inside.
The finished Tabernacle!
This was an amazing project to do together! I highly recommend it. It was such a blessing to see my children frequently referring to the Bible to be sure they were "making it right." And we talked constantly while we worked, discussing the various rituals and what possible meaning they could have for us today. We learned SO much and had fun doing it! It will definitely be a highlight of our year!
(p.s. we spent about $35 on materials for this project, but many of the materials did not get used up and can be used later for other projects. For instance, we bought a $10 package of sculpey clay, but only used half of it. We have lots of leftover yarn and paint as well. So the actual cost of making the Tabernacle was probably closer to $20. Money well spent!)
Monday, October 25, 2010
Disclaimer
There is a huge tendency among women in general, and homeschool moms in particular, to compare ourselves to others and find ourselves lacking. I can see what another homeschool mom is doing and think, "I should be doing that", or carried to the extreme, "I'm a loser at this and should just put my kids in building school." I know this because I have done it.
BUT.
It is terribly destructive. It takes our eyes off Jesus and fosters discontent and even envy. God has unique plans for each of our families, and we need to focus on the priorities He has given to us, not those He's given to someone else. We answer some day to HIM, not to each other.
If you are a homeschooling mom who uses Tapestry and you don't do unit celebrations, that is okay! If you are a homeschooling mom who doesn't use Tapestry at all, that's fine too! If you don't homeschool but instead trust the education of your children to others, that's great! It grieves me to think there may be those who read about our hands on activities or our unit celebrations and feel inadequate. If that is you, please stop reading my blog.
I'll be honest and tell you a little secret that feeds into our unit celebrations. We have a very difficult time finishing home maintenance projects here at our house. A set of beautiful half finished wooden bunk beds has been sitting in our garage for 6 years now, while our cars are parked in the driveway. There is a hole in my kitchen ceiling, made by an overly enthusiastic Jedi knight, that will probably be there until we sell the house someday and are forced to fix it. My biggest fear in starting our schoolroom expansion project this past summer was, what if we never finish it?
Psychologically, it makes me feel so good to have a unit celebration and mark that 9 week period of study as DONE. There are so many other things in my life that are not done.
My friend Guinever uses the Student Activity Pages that come with Tapestry each and every week. We are hit and miss with those.
My friend Marsha hits English grammar really hard. Us, not so much.
My friend Sally has an immaculate house. She would disagree with that, but she'd be wrong. ;-) She comes here and enjoys our artsy craftsy clutter. I go there and enjoy her nice, clean home.
I have friends who play with their children more than I do with mine. Some who do a much better job at teaching household chores. Some who do bulk cooking.
You get the point.
Can we learn from each other and be inspired and motivated by each other? Of course! This is one of our God given purposes as women, to encourage and mentor one another. But God has wired us all differently, and if we let those differences cause us to envy or doubt our own calling, or focus on our inadequacies rather than the complete adequacy and awesomeness of God, that is WRONG!
So, as I share about things we do in our homeschool, please keep in mind that I am striving to be faithful to what God has called our family to do, as one who will give an account.
And that as long as I am supervising hands on activities, I don't have to dust. :0)
Sunday, October 24, 2010
Tapestry Year 1 Unit 1 Celebration!
Last night we had a really fun time celebrating all we've learned in this first unit of Tapestry of Grace Year 1 (the ancient world). Here are some of our guests...
...and the rest of them (fyi, the tv was on to play cd's, not for tv watching! The only way we can play cd's on the main floor is in our dvd player. Just felt the need to explain that) ;-)
Since I was feeding a crowd, I made a big pot of lentil stew, served it with flatbread, and that was it (our guests may have had to eat again at home later, but it was super easy for me!). We had lentil stew because that is something Abraham very well may have eaten.
We showed our guests some of our school books and projects we'd made throughout this unit.
The Golden Goblet was a favorite literature book of both of our G children. Daughter G sketched a drawing of what she pictured the main character's house to look like.
She also made this shadow box picturing daily life in Ancient Egypt. There is a light behind the shoebox, and when you turn it off all you can see is the house. When the light comes on, it illuminates all the workers in the surrounding fields. It was a very cool project she did completely by herself!
My husband was the narrator for our program, and also shared first. He recited the poem Ozymandias from memory ~ a timely reminder of how great civilizations can eventually fall.
Little Man was Abraham, and he shared about the covenant that God had made with him. Is he not the cutest Abraham EVER??
Abraham's wife Sarah (me, alas no photo!) shared what her reaction was when she learned she would have a son in her old age. She laughed! First with unbelief, and then a year later, with joy.
We fast forwarded through the rest of the Patriarchs and arrived in Egypt during the time that Moses grew up. L played an Egyptian boy named Senmut and he read his report about Egyptian Pharoahs' tombs.
He had been growing his hair out since July so that we could give him one long lock on the side of his head just like Egyptian boys used to wear!
Next daughter G, also playing an Egyptian named Hatshepsut (not the queen), read her report on daily life in Egypt.
My husband narrated the life of Moses up until the time that God gave him the ten commandments on Mt. Sinai. Then Moses himself (son C) came and recited them for us! (he painted the Hebrew letters on the cardboard ten commandments himself!)
Lastly, Moses' brother Aaron (son G) came and shared about the duties of the High Priest.
He also explained our model of the Tabernacle, holding up each piece, telling what it was used for and who made it.
Here is our finished model (more on this later). The shape on the altar of burnt offering is a small plastic lamb being sacrificed. One of the boys had a priest figurine from an Indiana Jones play set that was the perfect size. He isn't dressed accurately but he's pretty close. :-) Daughter G made a small shofar from sculpey clay for him to blow. That's what he's holding in the picture below.
Even though this evening represented only 9 weeks of study, we learned so much during those 9 weeks that it felt as if we were barely scratching the surface. However, we and our guests had a lot of fun, and we're grateful for this chance to celebrate God's amazing grace as shown in history, and are looking forward to the next 9 weeks!